
Time to delve into OCaml, a functional programming language that was first released in 1996 and has gained popularity in the academic world. This article is for those who are interested in OCaml and want to learn more about the language. It covers parts that I felt I needed to learn when I started with OCaml, and it’s a continuation of the “concepts of functional programming” article I wrote a while ago.
Coming from a non-functional background myself, where I’ve written a lot of Rust and Go, I decided to give a functional programming language a try when Advent of Code started in 2023. OCaml seemed like the perfect choice, especially because it shares some features with Rust, such as matching, options, and pattern matching. However, in my opinion, unlike Haskell, OCaml is not a strict pure functional language.
This post will cover some important aspects when working with OCaml, such as how to define a function, modules, and the REPL. It will also highlight some features that I really like about it.
OCaml, previously known as Objective Caml (Categorical Abstract Machine Language), is a programming language that evolved from the ML programming language. ML is a functional programming language famous for its Polymorphic Hindley-Milner type system, which is derived from the lambda calculus and supports parametric polymorphism. Parametric polymorphism allows code to be written using generic types represented by variables, which can later be instantiated with specific types as needed.
OCaml extends ML with object-oriented features, which are recognized as classes and objects. Classes in OCaml are denoted by the usage of #. For example:
| |
OCaml is a statically typed language with inferred types, depending on how the value is used. For example:
| |
In this example, the compiler knows that print_endline requires a string type, which is inferred to print_message. This means that print_message needs a string and will not compile if provided with a different type.
In some languages you might need to define the types before you use them which could make your code look like the Haskell code below:
| |
If you want to learn more about functional programming in general, I have written a blog post called “Concepts of functional programming” where I discuss topics such as immutability and pure functions.
However, sometimes I still define the return type of a function as it can make it easier to define the function. By explicitly stating the return type, the compiler knows what to expect from the function.
Basic
Let’s start by creating a function and a variable and using them.
To create a variable in Ocaml, you can use the following syntax:
| |
Here, we create a variable named variable and assign the value “Hello :D” to it. The in keyword is used to indicate the end of the variable declaration.
The in keyword also allows us to pipe functions and store the result in a variable. For example:
| |
In this example, we demonstrate how to perform multiple functions on the string “Hello World :D” and store only the necessary information in the uppercase_string variable. This allows us to call an HTTP API, parse the output, retrieve a value, convert it to uppercase, and store it.
Creating a function can be done in a similar way using let. We define the logic inside the function, as shown in the following code:
| |
In this code, we create a function called hello that takes one argument. We use the argument to print something with print_endline and then return a unit. A unit represents “nothing”, so when we write a function that returns nothing, we actually return a unit. A bigger example of how to write function exists here.
REPL
REPL, or read-eval-print loop, is an interactive interface that developers can use to debug, test, or understand code within their OCaml projects. When writing code in the REPL, the compiler runs checks on your types, compiles, evaluates, and prints the inferred type and result value. The REPL tool for OCaml is called utop and comes with opam and dune.
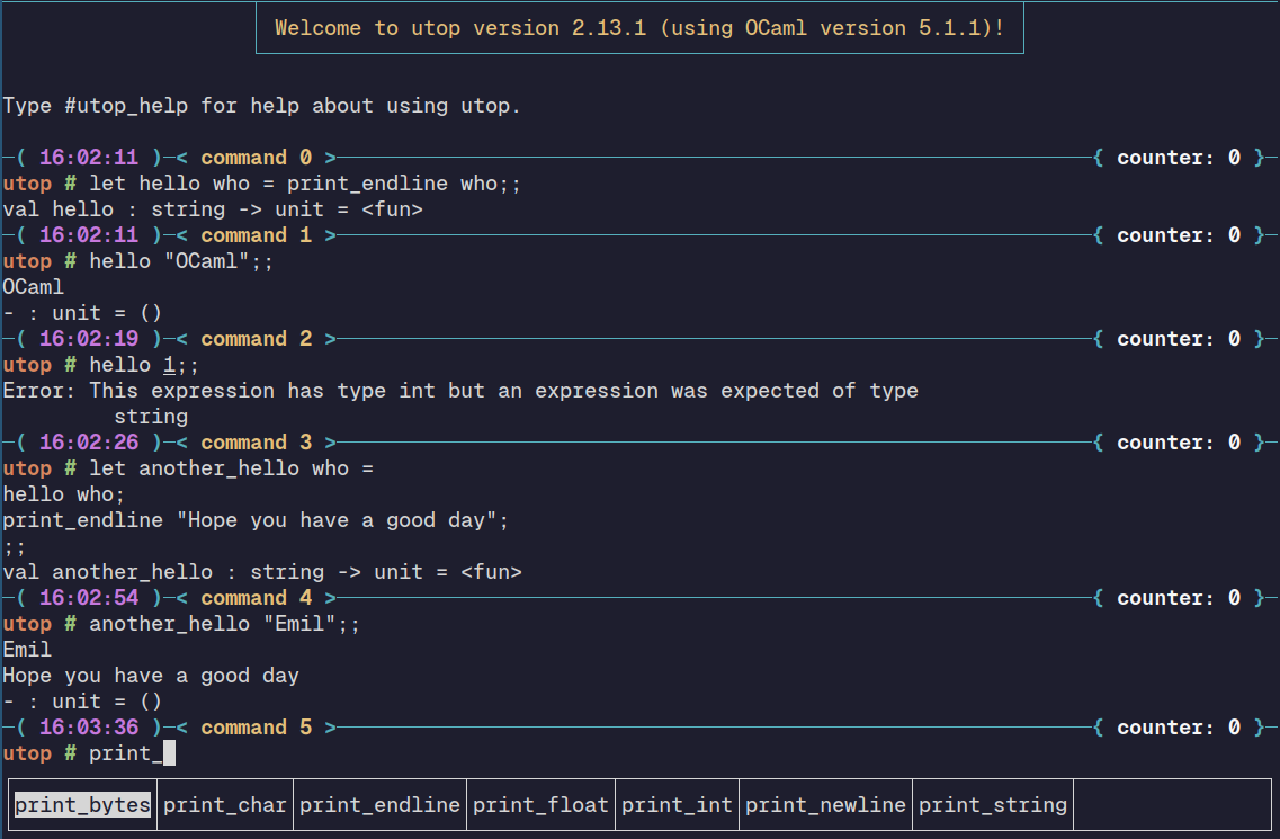
In the image above, I create a function called hello and execute it. In the output, I can see that the function hello takes 1 argument of type string and returns a unit (no return). I also create another function called another_hello where I call the hello function and print some additional values.
Even if I am not a big user of REPL is it a tool worth mention if you just want to play around with the language and explore your code.
Modules
This section discusses modules, which are a concept within OCaml that allow us to call functions from another file or create submodules (modules within a file).
In OCaml, files and folders are referred to as modules. We can use the names of the files to call functions within these files. For example, suppose we have two files in the same folder: one.ml and two.ml. The two.ml file contains a function called greetings that we want to call from one.ml to greet the user. To do this, we would write let () = Two.greetings () in our one.ml file. Alternatively, we can use the open Two statement to access the greetings function without specifying Two before calling it:
| |
In addition to modules, we can also create submodules within a file. Submodules work similarly, but instead of the entire file being a module, we define a part of the file as a module by creating a new Module within the file. Here’s an example:
| |
Modules can also refer to packages installed using opam. For example, if we install Riot using opam install riot and later want to use Riot within our code, we can call Riot directly or use open Riot. In this particular case, we consider Riot to be a module, even if it was imported from outside the project. Example on how we can use Riot in our code:
| |
Functors
While discussing modules, it is also important to mention functors. A functor is a construct that takes a module as a parameter and returns a new module.
The examples in this part are taken from the functors documentation
To explain it further, imagine you need a specific functionality, such as handling sets. However, the required functionality does not exist for Sets. In this case, you can create a module that implements the same functions as a Set by using a functor.
| |
In the above example, we create a new Set called StringCompare, which has a type of string and a method called compare that calls String.compare when needed. With this code, we can now use StringSet and its functions.
Disclaimer: Some functions in this code intentionally do not exist in the “StringCompare” class. The purpose is to demonstrate how it works, rather than providing a perfect example. Including all the necessary code for a perfect example would result in excessive code.
| |
Operators
In OCaml, operators allow you to combine one or more values (operands) to create a new value. These operations can involve mathematical calculations, logical evaluations, or manipulation of data structures, among other actions.
Arithmetic Operators
Developers often use arithmetic operations in OCaml to perform mathematical calculations. Let’s explore the two types of arithmetic operations:
- Integer Arithmetic: This type of arithmetic involves using the operators
+,-,*,/for addition, multiplication, subtraction, and division, respectively. - Floating-point Arithmetic: On the other hand, floating-point arithmetic uses the operators
+.,-.,*.and/.for addition, multiplication, subtraction, and division, respectively.
And example usage of these are
| |
Comparison Operators
Comparison operations return either true or false. The most commonly used operands for comparison are:
=(equals)<>(not equals)<(less than)>(greater than)<=(less than or equal to)>=(greater than or equal to)
| |
Binary Operators
Binary operators in OCaml are regular functions, but they are used in a slightly different way. A binary operator allows us to simplify development by assigning logic to an operand, which can then be used instead of calling a function. The operand is defined using parentheses and can use the surrounding arguments. In the example below, the arguments are “hi” and “friend”.
It is important to note that if you define the operand name with only one character, the operand function will expect only one argument. Therefore, if you want to achieve a result similar to the example below, you need to use two characters when creating the operand.
| |
In this example, we create a function called cat that takes two strings and returns a string. Then, we create an operand and assign the cat function to it. Later, we use this operand to add a space between “hi” and “friend”.
Binding Operators
Binding operators are quite handy when writing OCaml code as they provide a way to simplify the code. These operators allow us to create custom let bindings by assigning them a value. They can be useful in cases where we only want to handle successful values and don’t need to handle negative values that may occur in applications. For example, when dealing with an unsuccessful HTTP call, we may only want to handle an OK response, and a binding operator can be a useful tool.
Let’s use an example from the operator documentation on ocaml.org:
| |
In this code, we create a binding operator called let* and assign it to Option.bind. This allows us to return early if we don’t find / in the provided string when running let* slash = rindex_opt s '/' within the code. Thanks to the let*, we no longer need to match the value on rindex_from_opt, as we will already return None if there is no / in the string.
End
I hope you enjoyed this article. It covers the topics I found necessary to learn when transitioning to OCaml from a background primarily in Go and Rust. The most challenging aspect of starting with OCaml was not the language itself, but rather breaking free from a non-functional programming mindset. An interesting example of this occurred when I shared my Advent of Code challenge with a colleague. He couldn’t resist rewriting the entire code because I had used refs to solve it.
I want to express my sincere gratitude to everyone in the Caravan Discord community. When I asked if there was anything else I should cover, people responded happily. If you’re interested in joining a Discord community full of functional programming enthusiasts, here is the link: Caravan Discord Community.